
Am Fam Physician. 2002;66(12):2231-2236
The interrupted vertical and horizontal mattress suture techniques are two of the most commonly used skin closure methods. These mattress sutures promote wound edge eversion and less prominent scarring. Vertical and horizontal mattress sutures allow for skin edges to be closed under tension when wound edges have to be brought together over a distance. The corner stitch, a variation of the horizontal mattress suture, is commonly used for closure of angled skin flaps or wounds. Although mattress sutures can produce surface scarring or “railroad marks,” early removal of these sutures can limit this damage.
The interrupted horizontal and vertical mattress suture techniques are two of the most commonly used skin closure methods.1–3 These techniques provide many advantages, including the closure of wounds under tension when wound edges must be brought together over a distance. Mattress sutures are often performed as the anchoring stitch for skin flap closure.1 Mattress suture techniques also promote skin edge eversion.1–8 Because scars tend to retract over time, eversion of the wound edges at the time of closure promotes less prominent scarring. Eversion produced by the mattress sutures is valuable when closing sites with edges that tend to roll under, such as on the posterior neck or in the groin.
The techniques, indications, and pitfalls related to the standard mattress sutures are demonstrated in this article. One variation of the horizontal mattress suture, the half-buried horizontal mattress or corner stitch, is included because of its great usefulness in office closures. All of the suture techniques discussed in this article make use of nonabsorbable suture material.1,4
Vertical Mattress Suture
The main indication for use of vertical mattress sutures is to evert the skin edges.1–8 By incorporating a large amount of tissue within the passage of the suture loops, the technique permits greater closure strength and better distribution of wound tension.1,3 The vertical mattress suture is commonly used in body sites where the wound edges tend to invert, such as the posterior neck or wounds that occur on a concave surface. Some authors believe that a properly placed vertical mattress suture everts wound edges better than any other suture technique.5
The vertical mattress suture uses the far-far, near-near system (Figure 1). The far-far suture placement passes 4 to 8 mm from the wound edge, fairly deep in the wound below the dermis.1 Prior undermining of the wound edges facilitates the placement of the sutures. Following the far-far passage of the needle across both sides of the wound, and before the suture is tied, the needle is placed backwards in the needle driver. The near-near placement occurs at a shallow depth (about 1 mm) and should be in the upper dermis. The near-near placement should be within 1 to 2 mm of the wound edge. Following the near-near passage of the needle, both ends of the suture thread should be tied on one side of the wound. These ends are tied so that the knot is on the side where the suture passage began.
The vertical mattress suture should be tied snugly, but gently. Excessive pull on the knot will create more eversion of the edges and produce excess tension and scarring. This excess tension also can tear the skin at the near-near placement site. Necrosis of the skin beneath the externalized loops of the vertical mattress suture has been noted when the knot is tied too tightly. In addition, the natural process of wound inflammation and scar retraction will pull loops of suture that lie on the skin surface downward. This pull results in small skin scars that have been given a variety of names, including cross-hatching, railroad marks, or Frankenstein marks. The tendency to create these scars limits the use of vertical mattress sutures in cosmetically sensitive areas, such as the face.
The choice of suture material also influences scar formation, because materials with a large diameter (2-0 or 3-0 absorbable) produce greater skin injury than small-caliber (5-0 or 6-0) suture material.1 Early removal of sutures can minimize the effect of cross-hatching, but care must be taken to prevent the wound from opening (wound dehiscence). Mattress sutures can be alternated with simple interrupted sutures; in this case, the mattress sutures can be removed first.
Placement of deep, buried subcutaneous sutures is commonly advocated to reduce the tension on skin sutures, close dead space beneath a wound, and allow for early suture removal. Many authorities recommend placement of the deep buried suture whenever possible. When placement of subcutaneous sutures is not advocated (e.g., facial flaps), the skin sutures may need to remain in place for a longer time. Table 1 gives general guidelines for suture removal times.
The vertical mattress suture should be symmetrically placed. If the loops of suture are not placed at equal depths and equidistantly from the wound edge, the wound may come together with one edge higher than the other, creating a shelf that usually results in a cosmetically and functionally inferior scar.1,5 Shelves on a vertical surface such as the face tend to produce final scars that cast a shadow. Interrupted vertical mattress sutures should be removed from most wounds in four to six days.8
Some physicians prefer a near-near, far-far technique. The near-near pass is made, and the suture threads lifted for placement of the far-far pass. Novice physicians may tear the wound edge by lifting a superficially placed (near-near) suture thread if this technique is used. To avoid tearing, near-near placement is often performed at a deeper or wider level, but this often reduces skin edge eversion. The far-far, near-near technique is advocated to avoid this problem.
Horizontal Mattress Suture
The horizontal mattress suture is an everting suture technique that spreads tension along a wound edge.1,6,7 This technique is commonly used for pulling wound edges together over a distance, or as the initial suture to anchor two wound edges (holding sutures).1,3,7 These sutures, like the vertical mattress sutures, incorporate a large amount of tissue within the passage of the suture thread, and they can serve as effective initial sutures in holding skin flaps in place.1,3 The suture is also effective in holding fragile skin together, such as the skin of an elderly patient or a patient receiving chronic steroid therapy.
The horizontal mattress suture (Figure 2) is initiated by inserting the needle about 4 to 8 mm from the wound edge, slightly farther from the wound edge than for placement of simple interrupted sutures. The needle passes through to the opposite wound edge, where it exits the skin. The needle is placed backwards in the needle driver, inserted into the skin about 4 to 8 mm farther down that edge (the edge where the needle has just been passed through), and passed from the far side of the wound back to the near side. The needle exits the skin about 4 to 8 mm down the original wound edge from the original insertion site. The suture is tied gently on the side of the wound where the suturing began.
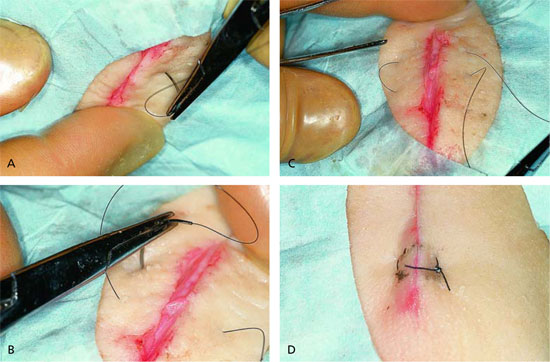
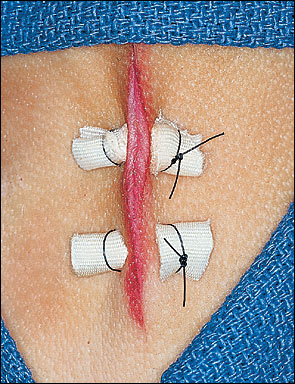
The extracutaneous loops of suture material (suture on the surface of the skin) tend to compress the epidermis. If the suture is tied tightly, these loops of suture material can actually cause strangulation, necrosis, and scarring of the skin.1 Some authors advocate the use of bolsters (Figure 3), or compressible cushions, beneath the suture loops.1,3,5,7 Plastic tubing, cardboard, and gauze are materials that are commonly used for bolsters.1
Because of the tissue contained within the passage of the suture thread, horizontal mattress sutures are effective hemostatic sutures on vascular tissues such as the scalp.1 In addition, these sutures are highly effective for closure of thin skin, such as in the finger- and toe-web spaces, or on the eyelid, using a small-caliber (6-0) suture material.
Because of the risk of scarring from horizontal mattress sutures, some authorities recommend that they be removed as early as three to five days after placement. Early suture removal is especially important in cosmetically important areas. If the horizontal mattress suture is surrounded by simple interrupted sutures, the mattress sutures can be removed early, and the remaining sutures can be removed later, in a time frame appropriate to the body location.
Corner Stitch
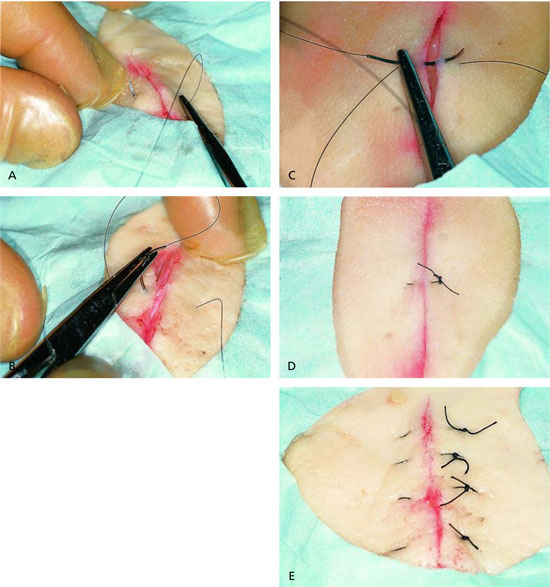
A variation of the horizontal mattress suture, the half-buried horizontal mattress suture, or corner stitch, is commonly used in closures performed in the office.1 The corner stitch (Figure 4) is used to approximate angled skin flaps or corners without compromising blood supply to the tissue tip.1,3,8,9 This suture technique avoids the tedious task of trying to place small sutures to hold both edges of a corner down without crossing any of the sutures near the tip.3,5
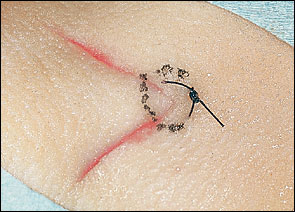
The standard corner stitch is used for closure of tissue corners with an approximate 90-degree angle. Many variations of the corner stitch can be applied to close a variety of complex wounds, tissue with multiple corners, or skin flaps. Closure of Y-shaped or X-shaped wounds (Figure 5) is often accomplished with a corner stitch used for the central corners.
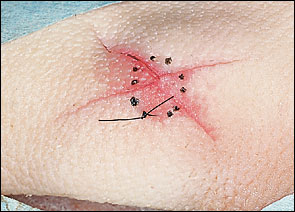
The corner suture is best initiated near an imaginary line that bisects the tissue opposite the tissue corner. This allows the pull of the tissue directly into the corner, and not off to one side. A plumb line drawn opposite the corner will help guide the start and finish of the corner stitch (Figure 6). The needle enters the skin next to the plumb line (1 to 2 mm from the line) about 6 to 8 mm from the corner. The needle passes to the wound edge about 4 to 6 mm from the corner. It enters into the wound at the depth of the deep dermis, not beneath the dermis.
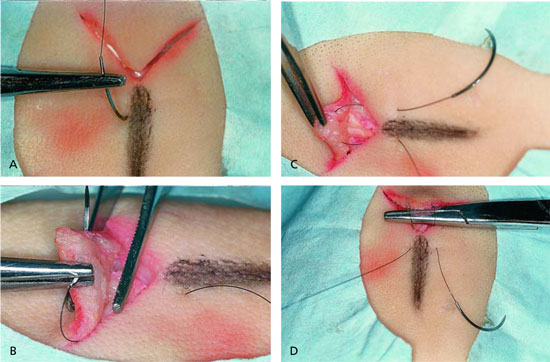
The corner flap is elevated with Adson forceps (pick-ups), and the needle is passed from one edge of the flap to the opposite edge of the flap. The needle passes through the deepest portion of the flap dermis, about 4 mm from the corner tip. After passing through the corner, the needle can be placed backward in the needle holder. The needle then passes about 4 to 6 mm from the corner into the deep dermis of the opposite edge from where the needle previously passed. The needle exits the skin on the opposite side of the plumb line,6 to 8 mm from the corner. The suture is tied gently, allowing the tip to fit snugly into the corner. If the suture is tied too tightly, the corner tends to buckle.