
Am Fam Physician. 2009;79(1):16-22
Patient information: See related handout on casting and splinting, written by the authors of this article.
Author disclosure: Nothing to disclose.
The ability to properly apply casts and splints is a technical skill easily mastered with practice and an understanding of basic principles. The initial approach to casting and splinting requires a thorough assessment of the injured extremity for proper diagnosis. Once the need for immobilization is ascertained, casting and splinting start with application of stockinette, followed by padding. Splinting involves subsequent application of a noncircumferential support held in place by an elastic bandage. Splints are faster and easier to apply; allow for the natural swelling that occurs during the acute inflammatory phase of an injury; are easily removed for inspection of the injury site; and are often the preferred tool for immobilization in the acute care setting. Disadvantages of splinting include lack of patient compliance and increased motion at the injury site. Casting involves circumferential application of plaster or fiberglass. As such, casts provide superior immobilization, but they are more technically difficult to apply and less forgiving during the acute inflammatory stage; they also carry a higher risk of complications. Compartment syndrome, thermal injuries, pressure sores, skin infection and dermatitis, and joint stiffness are possible complications of splinting and casting. Patient education regarding swelling, signs of vascular compromise, and recommendations for follow-up is crucial after cast or splint application.
The initial approach to casting and splinting requires a thorough assessment of the skin, neurovascular status, soft tissues, and bony structures to accurately assess and diagnose the injury.1 Once the need for immobilization has been determined, the physician must decide whether to apply a splint or a cast.
| Clinical recommendation | Evidence rating | References |
|---|---|---|
| Splinting is the preferred method of fracture immobilization in the acute care setting. | C | 4 |
| Casting is the mainstay of treatment for most fractures. | C | 4 |
| Plaster should be used for most routine splinting applications. However, when weight or bulk of the cast or the time to bearing weight is important, a synthetic material chosen principally on the basis of cost is indicated. | C | 6 |
Splinting Versus Casting
Casts and splints serve to immobilize orthopedic injuries (Table 1).2 They promote healing, maintain bone alignment, diminish pain, protect the injury, and help compensate for surrounding muscular weakness. Improper or prolonged application can increase the risk of complications from immobilization (Table 2).2,3 Therefore, proper application technique and timely follow-up are essential.3
| Fractures |
| Sprains |
| Severe soft-tissue injuries |
| Reduced joint dislocations |
| Inflammatory conditions: arthritis, tendinopathy, tenosynovitis |
| Deep laceration repairs across joints |
| Tendon lacerations |
| Compartment syndrome | |
| Ischemia | |
| Heat injury | |
| Pressure sores and skin breakdown | |
| Infection | |
| Dermatitis | |
| Joint stiffness | |
| Neurologic injury |
When considering whether to apply a splint or a cast, the physician must assess the stage and severity of the injury, the potential for instability, the risk of complications, and the patient's functional requirements. Splinting is more widely used in primary care for acute as well as definitive management (management following the acute phase of an injury) of orthopedic injuries. Splints are often used for simple or stable fractures, sprains, tendon injuries, and other soft-tissue injuries; casting is usually reserved for definitive and/or complex fracture management.
ADVANTAGES OF SPLINTING
Splint use offers many advantages over casting. Splints are faster and easier to apply. They may be static (i.e., prevent motion) or dynamic (i.e., functional; assist with controlled motion). Because a splint is noncircumferential, it allows for the natural swelling that occurs during the initial inflammatory phase of the injury. Pressure-related complications (e.g., skin breakdown, necrosis, compartment syndrome) increase with severe soft-tissue swelling, particularly in a contained space such as a circumferential cast (Table 2).2,3 Therefore, splinting is the preferred method of immobilization in the acute care setting.4 Furthermore, a splint may be removed more easily than a cast, allowing for regular inspection of the injury site. Both custom-made and standard “off-the-shelf” splints are effective.2
DISADVANTAGES OF SPLINTING
Disadvantages of splinting include lack of patient compliance and excessive motion at the injury site. Splints also have limitations in their usage. Fractures that are unstable or potentially unstable (e.g., fractures requiring reduction, segmental or spiral fractures, dislocation fractures) may be splinted acutely to allow for swelling or to provide stability while awaiting definitive care. However, splints themselves are inappropriate for definitive care of these types of injuries. Such fractures are likely to require casting and orthopedic referral.4
ADVANTAGES AND DISADVANTAGES OF CASTING
Materials and Equipment
Plaster has traditionally been the preferred material for splints.5,6 One advantage is that plaster is more pliable and has a slower setting time than fiberglass, allowing more time to apply and mold the material before it sets. Materials with slower setting times also produce less heat, thus reducing patient discomfort and the risk of burns. Fiberglass is a reasonable alternative because the cost has declined since it was first introduced, it produces less mess, and it is lighter than plaster. Fiberglass is commonly used for nondisplaced fractures and severe soft-tissue injuries. Previous literature has demonstrated the benefits of using plaster rather than fiberglass following fracture reduction.6 Table 3 lists standard materials and equipment used in splint and cast application.2
| Adhesive tape (to prevent slippage of elastic wrap used with splints) | |
| Bandage scissors | |
| Basin of water at room temperature (dipping water) | |
| Casting gloves (necessary for fiberglass) | |
| Elastic bandage (for splints) | |
| Padding | |
| Plaster or fiberglass casting material | |
| Sheets, underpads (to minimize soiling of the patient's clothing) | |
| Stockinette |
Regardless of the material used, the most important variable affecting the setting time is water temperature (Table 4).7 Casting materials harden faster with the use of warm water compared with cold water. The faster the material sets, the greater the heat produced, and the greater the risk of significant skin burns. Cool water is also recommended when extra time is needed for splint application.
| Factors that speed setting times |
| Higher temperature of dipping water |
| Use of fiberglass |
| Reuse of dipping water |
| Factors that slow setting times |
| Cooler temperature of dipping water |
| Use of plaster |
The dipping water should be kept clean and fresh. In general, the temperature of the water should be tepid or slightly warm for plaster, and cool or room temperature for fiberglass. These temperatures allow for a workable setting time and have not been associated with increased risk of significant burns. Applying excess material or using an overly compressive elastic wrap also increases the risk of excessive heat production. Therefore, it is best to use only the amount of splinting material and compression required to stabilize the injury.8 A good rule of thumb is that heat is inversely proportional to the setting time and directly proportional to the number of layers used.
General Application Procedures
The physician should carefully inspect the involved extremity and document skin lesions, soft-tissue injuries, and neurovascular status before splint or cast application. Following immobilization, neurovascular status should be rechecked and documented. The patient's clothing should also be covered with sheets to protect it and the surrounding area from being soiled by water and plaster or fiberglass.
PREPARING THE INJURED AREA
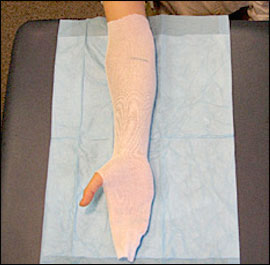
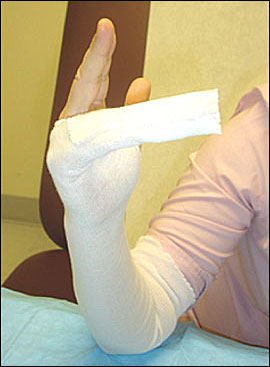
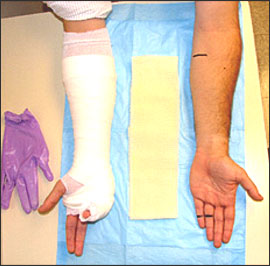
To prepare the injured extremity for splinting, stockinette is measured and applied to cover the area and extend about 10 cm beyond each end of the intended splint site (Figures 1 through 3). Later, once the padding and splint material have been applied, the excess stockinette is folded back over the edges of the splint to form a smooth, padded edge. Care should be taken to ensure that the stockinette is not too tight, and that wrinkling over flexion points and bony prominences is minimized by smoothing or trimming the stockinette. Generally, a stockinette 2 to 3 inches wide is used for the upper extremities and 4 inches wide for the lower extremities.
Once a physician is proficient in splinting, an acceptable alternative is to create a splint without the use of a stockinette. This technique may be particularly useful if dramatic swelling is anticipated and care is being taken to avoid using any circumferential materials that are not essential. To create a splint without stockinette, padding that is slightly wider and longer than the splinting material should be applied in several layers directly to the smoothed, wet splint. Together, the padding and splinting material are molded to the extremity.
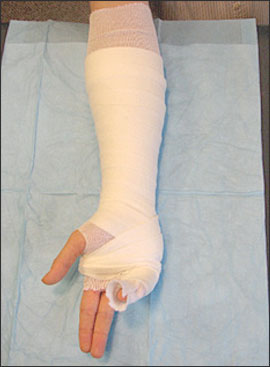
Next, layers of padding are placed over the stockinette to prevent maceration of the underlying skin and to accommodate for swelling. Padding is wrapped circumferentially around the extremity, rolling the material from one end of the extremity to the other, each new layer overlapping the previous layer by 50 percent. This technique will automatically provide two layers of padding. Extra layers may be added over the initial layers, if necessary. The padding should be at least two to three layers thick without being constrictive, and should extend 2 to 3 cm beyond the intended edges of the splint (Figure 4). Extra padding is placed at each end of the intended splint border, between digits, and over areas of bony prominence. Prominences at highest risk are the ulnar styloid, heel, olecranon, and malleoli. If significant swelling is anticipated, more padding may be used; however, care must be taken not to compromise the support provided by the splint by using too many layers. Both too much and too little padding are associated with potential complications and poor fit of the splint or cast (Table 5).2,4
| Use appropriate amount and type of padding |
| Properly pad bony prominences and high-pressure areas |
| Properly position the extremity before, during, and after application of materials |
| Avoid tension and wrinkles on padding, plaster, and fiberglass |
| Avoid excessive molding and indentations |
Joints should be placed in their proper position of function before, during, and after padding is applied to avoid areas of excess wrinkling and subsequent pressure. In general, the wrist is placed in slight extension and ulnar deviation, and the ankle is placed at 90 degrees of flexion. Padding comes in several widths. In general, padding 2 inches wide is used for the hands, 2 to 4 inches for upper extremities, 3 inches for feet, and 4 to 6 inches for lower extremities.
Prefabricated splints are also available. They consist of fiberglass, padding, and a mesh layer, and are easily cut and molded to the injured extremity. These prefabricated splints, however, are more expensive and are not available in all settings.
SPLINT PREPARATION
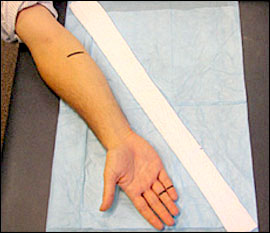
To estimate the length of splint material needed, the physician should lay the dry splint next to the area being splinted (Figure 5). An additional 1 to 2 cm should be added at each end of the splint to allow for shrinkage that occurs during wetting, molding, and drying. Ultimately, the splint should be slightly shorter than the padding.
If using plaster, the physician should measure and layer the appropriate number of sheets for the desired splint. If using a roll of fiberglass, the physician should unroll the splint material to the appropriate length to create the first layer. When the splint edge is reached, the next layer should be folded back on itself to create the subsequent layer. This process should be repeated until a splint with the appropriate number of layers has been created. The thickness of the splint depends on the patient's size, the extremity involved, and the desired strength of the final product. For an average-size adult, upper extremities should be splinted with six to 10 sheets of material, whereas lower extremity injuries may require 12 to 15 sheets. Use of more sheets provides more strength, but the splint will weigh more, produce more heat, and be bulkier. In general, the minimum number of layers necessary to achieve adequate strength should be used.
SPLINT APPLICATION
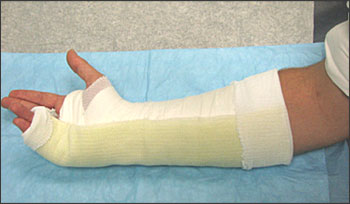
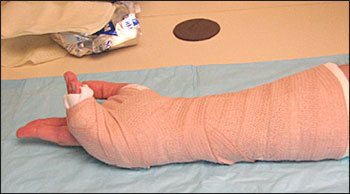
Dry, layered splint material should be submerged in water until bubbling from the materials stops. The splint is removed and excess water squeezed out. Fiberglass will feel damp; plaster will have a wet, sloppy consistency. The splint is then placed on a hard surface and smoothed to remove any wrinkles and to ensure even wetness of all layers. With the extremity still in its position of function, the wet splint is placed over the padding and molded to the contours of the extremity using only the palm of the hand to avoid pressure points produced by the fingers. Finally, the stockinette and padding edges are folded back to create a smooth edge (Figure 6). The dried splint is secured with an elastic bandage wrapped in a distal to proximal direction (Figure 7).
CAST APPLICATION
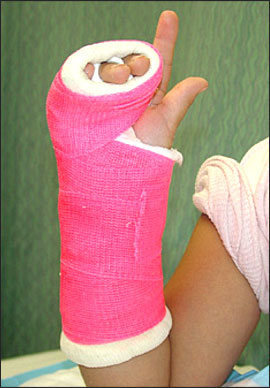
The principles of casting are similar to those of splinting (Table 5).2,4 Once the extremity has been prepared with stockinette and padding and placed in the desired position, the plaster or fiberglass material is applied. The casting material is wrapped circumferentially, with each roll overlapping the previous layer by 50 percent. The physician should avoid placing excess tension on the plaster or fiberglass because it can create a tight, constrictive cast that may damage underlying skin through pressure, neurovascular compromise, or both. Conversely, a cast that is overly padded or loosely applied can allow for significant rubbing, friction, and skin injuries (e.g., abrasions, friction blisters). Just before the final layer of casting material is applied, the physician should fold back the stockinette and padding, and then apply the final layer (Figure 8), molding the cast while the materials are still malleable.
Complications of Splinting and Casting
Compartment syndrome is the most serious complication of casting or splinting. It is a condition of increased pressure within a closed space that compromises blood flow and tissue perfusion and causes ischemia and potentially irreversible damage to the soft tissues within that space. If an immobilized patient experiences worsening pain, tingling, numbness, or any sign of vascular compromise such as severe swelling, delayed capillary refill, or dusky appearance of exposed extremities, an immediate visit to the nearest emergency department or urgent care office is indicated for prompt removal of the cast.
Thermal injuries to the skin can occur as a result of the casting or splinting process.7 Skin breakdown is the most common complication, often caused by focal pressure from a wrinkled, unpadded, or underpadded area over a bony prominence or underlying soft tissue. This can be minimized by ensuring that the padding is adequate and smooth, without indentations during application.
Bacterial and fungal infections or a pruritic dermatitis can develop beneath a splint or cast. Infection is more common with an open wound, but the moist, warm environment of a splint or cast can be ideal for infection.9 Finally, some degree of joint stiffness is an inevitable complication of immobilization. With proper application technique and effective patient education, complications can be minimized.
Follow-up and Length of Immobilization
Educating patients about cast and splint care is crucial. They should receive both verbal and written instructions on the importance of elevating the injured extremity to decrease pain and swelling, and on splint/cast care and precautions. They should also refrain from getting the material wet or pushing objects inside a cast to scratch. It is extremely important that patients continually check for signs of compartment syndrome and report immediately to an urgent or emergent care facility for removal of the cast or splint at the first sign of vascular compromise. Ice can be applied for 15 to 30 minutes at a time over a cast or splint. Strong opioids should be used with caution during the first two to three days after splinting because they can mask pain that would otherwise prompt a follow-up visit.4
Time to follow-up and length of immobilization are extremely variable, depending on the site, type, and stability of the injury and on patient characteristics (e.g., age, accessibility, compliance). Most splints and casts require initial follow-up within one to two weeks after application, and most fracture guidelines estimate four to eight weeks for healing. However, all injuries must be assessed, treated, and followed on an individual basis.