The intrauterine device (IUD) is an effective contraceptive for many women. The copper-releasing IUD can be used for 10 years before replacement and is a good choice for women who cannot, or choose not to, use hormone-releasing contraceptives. However, some women experience an increase in menstrual blood loss and dysmenorrhea. The progestin-releasing IUD can be used for five years. It may reduce menorrhagia and dysmenorrhea, although some women have increased spotting and bleeding during the first months after insertion. The ideal candidates for IUD use are parous women in stable, monogamous relationships. Pregnancy, unexplained vaginal bleeding, and a lifestyle placing the woman at risk for sexually transmitted diseases are contraindications to IUD use. Insertion of the IUD can take place at any time during the menstrual cycle provided the woman is not pregnant. Before insertion, a bimanual examination and a sounding of the uterus are necessary to determine the uterus position and the depth of the uterine cavity. The IUD is inserted into the uterus according to individual protocols, with the threads cut at a length to allow the patient to check the device’s position. Expulsion may occur with both types of IUDs.
For many years, the intrauterine device (IUD) has been a contraceptiv choice for women. In 1995, the IUD was used by 11.9 percent of women of reproductive age worldwide, but by only 1.5 percent of women in North America.1 A potential reason for this difference in use is the negative perception of IUDs created as a result of complications associated with the Dalkon Shield.
The Dalkon Shield was an IUD introduced in 1970 and recalled in 1975. It was associated with a significant incidence of pelvic inflammatory disease (PID) because its multifilament threads were believed to be prone to transmitting bacteria into the uterus and fallopian tubes.
Today, two IUDs are approved for use in the United States: a copper-releasing device (ParaGard) and a hormone-releasing device (Mirena). Both IUDs have monofilament threads that minimize the risk for bacteria transmission.
The copper-releasing IUD (Figure 1) is a T-shaped polyethylene device with 380 mm2 of exposed surface area of copper on its arms and stem. The released copper ions interfere with sperm mobility and incite a foreign-body reaction that results in a spermicidal environment.2 Barium sulfate has been added to the polyethylene substrate to make the device radiopaque. A 3-mm plastic ball is located at the base of the IUD, through which the monofilament thread passes. Once inserted, the IUD can remain in place for up to 10 years.
Figure 1
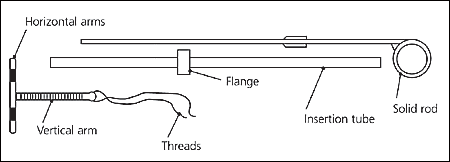
Copper-releasing intrauterine device (ParaGard) and inserter. Reprinted with permission from FEI Women’s Health.
The hormone-releasing IUD (Figure 2) is a radiopaque T-shaped device with 52 mg of levonorgestrel on its arms and stem. The progestin is released at a rate of 20 mcg a day. Levonorgestrel is thought to thicken cervical mucus, creating a barrier to sperm penetration through the cervix, and it may stop ovulation and thin the uterus lining. Once inserted, the IUD can remain in place for up to five years.
Figure 2
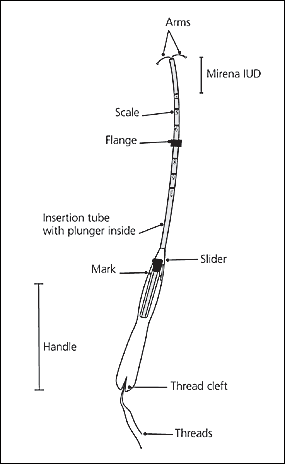
Hormone-releasing intrauterine device (Mirena) and inserter. Reprinted with permission from Berlex, Inc.
Data are conflicting on which mechanism primarily is responsible for efficacy of IUDs. The results of a recent review indicated that pre- and post-fertilization mechanisms of action play a role in both IUDs.3 [Evidence level B, systematic review of studies] The copper-releasing IUD and the hormone-releasing IUD have been shown in clinical trials to be 99.2 percent and 98 percent effective, respectively, in preventing pregnancy in one year of typical use.4,5
The contraceptive effects of the IUD are reversible after removal. The results of a recent study suggest that long-term IUD use (i.e., more than 78 months [6.5 years]) may be associated with an increased risk for fertility impairment.6 [Evidence level C, prospective cohort study]
Recommended Patient Profile and Contraindications
IUDs are for parous women who are in a stable, mutually monogamous relationship, with no history of PID. Although not contraindicated in this group, nulliparous women tend to have higher expulsion and failure rates, and also offer more challenging insertion because they have a smaller uterine cavity.7
Women exposed to sexually transmitted diseases (STDs) have a greater chance of developing PID. A history of PID suggests a risk for reinfection, although a remote history does not totally preclude choosing an IUD. A World Health Organization scientific working group concluded that women who have been pregnant after an occurrence of PID and are not currently at risk for infection can be candidates for IUDs.1
The hormone-releasing IUD may benefit women with anemia, menorrhagia, or dysmenorrhea.8 While there is a greater risk for spotting or irregular bleeding during the first three months after insertion of this device, the risk decreases significantly at 12 months post-insertion.9
Both IUDs are classified as pregnancy category X. Contraindications are summarized in Table 1.4,5,7,10,11
TABLE 1 Contraindications to IUD Insertion
| Acute liver disease or liver carcinoma* |
| Breast carcinoma* |
| Confirmed or suspected pregnancy |
| Copper allergy† |
| Genital actinomycosis |
| History of ectopic pregnancy |
| History of pelvic inflammatory disease unless subsequent intrauterine pregnancy occurred |
| Immunodeficiency disorders |
| Immunosuppressive therapy |
| Jaundice* |
| Known or suspected pelvic malignancy |
| Multiple sexual partners for patient or her partner |
| Postpartum endometritis or septic abortion in previous three months |
| Undiagnosed vaginal bleeding |
| Uterine abnormality |
| Wilson’s disease† |
IUD = intrauterine device.
*—Specific for hormone-releasing IUD (Mirena).
†—Specific for copper-releasing IUD (ParaGard).
Precautions
IUDs may be inserted anytime during the menstrual cycle. Documentation of a negative pregnancy test is prudent. Insertion may be performed during menstruation to provide additional reassurance that the woman is not pregnant.
If insertion is planned during the luteal phase, another nonhormonal contraceptive should be used until after the next menses. A pregnancy test can be done, but the patient should be made aware that a pregnancy test at this time cannot always rule out early pregnancy.
An IUD should not be inserted in a woman with an STD. The American College of Obstetricians and Gynecologists recommends a pelvic examination before insertion to screen for Chlamydia and gonorrhea.12 [Evidence level C, consensus/expert guidelines]
Routine prophylactic antibiotic administration is not necessary.13 [Evidence level A, high-quality meta-analysis] Studies have demonstrated that the use of prophylactic antibiotics at the time of IUD insertion provides little, if any, benefit. Doxycycline (Vibramycin) or erythromycin may be used for prophylaxis.10,12
According to the American Heart Association, antibiotic prophylaxis in patients at risk for endocarditis is not necessary before IUD insertion or removal.14 [Evidence level C, expert/consensus guidelines]
Patient Preparation
The physician should discuss with the patient the risks and benefits of the IUD and, if necessary, other forms of contraception. The patient should review the manufacturer’s patient information materials and have the opportunity to discuss with her physician any concerns. Informed consent may be obtained after these steps are completed.
Administration of a nonsteroidal anti-inflammatory drug (e.g., 600 to 800 mg of ibuprofen [Motrin]) one hour before insertion may alleviate discomfort. The physician should instruct the patient about how to locate the IUD threads. It is necessary for the woman to locate the threads to verify the position of the IUD after each menstruation. The patient should be told to call her physician’s office if she is ever unable to locate the IUD threads.
Insertion
COPPER-RELEASING IUD
The proper equipment (Table 2) should be assembled before the procedure. Then, a bimanual examination with nonsterile gloves should be performed to determine the position of the uterus.
TABLE 2 Equipment for IUD Insertion
| Cervical tenaculum |
| Cotton balls moistened with antiseptic solution or povidone-iodine (Betadine) swabs |
| Long suture scissors |
| Ring forceps |
| Sterile and nonsterile examination gloves |
| Sterile IUD package with IUD |
| Sterile tray for the procedure |
| Sterile vaginal speculum |
| Uterine sound |
IUD = intrauterine device.
The arms of the IUD are to be folded into the insertion tube far enough to retain them. This can be done before the start of the procedure, working through the sterile package (Figure 3).
Figure 3
The arms of the copper-releasing intrauterine device are folded into the insertion tube. Reprinted with permission from FEI Women’s Health.
Sterile technique, including sterile gloves, is necessary during the procedure to minimize the risk of contamination or infection. The cervix and adjacent vaginal fornices should be cleansed liberally with an antiseptic solution. Chlorhexidine gluconate (Hibiclens) may be used if the patient is allergic to iodine.
The physician should stabilize the cervix during the insertion of the IUD with a tenaculum. Local anesthesia, such as 5 percent lidocaine gel (Xylocaine) placed in the cervical canal, or a paracervical block may be used to minimize discomfort.
A sterile uterine sound should be used to determine the depth of the uterine cavity. Contact with the vagina or speculum blades should be avoided. The uterine sound has a bulbous tip to help prevent perforation. An alternative to the uterine sound is an endometrial aspirator such as those used for endometrial biopsy sampling. An adequate uterine depth is between 6 and 9 cm and should be documented in the patient’s record. An IUD should not be inserted if the depth of the uterus is less than 6 cm.
The physician should use sterile gloves to remove the IUD from the sterile package. The blue flange should be aligned with the IUD arms and set at the distance the uterus was sounded. The white inserter rod should then be placed into the insertion tube at the end opposite the arms of the IUD and approximated against the ball at the base of the IUD.
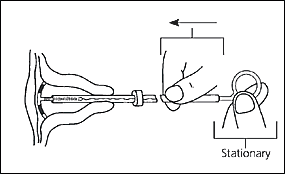
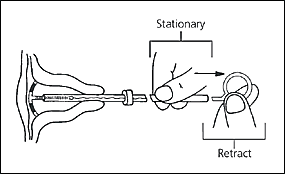
The physician should then insert the IUD into the uterus until the flange is against the cervical os. The clear inserter tube should be pulled back on the insertion rod approximately 2 cm so that the arms can spread to the “T” position (Figure 4). The tube should be advanced slowly to ensure a correct positioning of the IUD (Figure 5). The physician should remove the insertion rod by holding the insertion tube in place (Figure 6) and then remove the insertion tube and the tenaculum. Finally, the threads emerging from the cervical os should be cut to a length of 3 cm. The length of the threads in the vagina should be noted in the patient’s record for further reference.
Figure 4
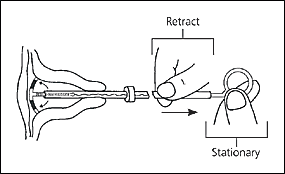
The arms of the copper-releasing intrauterine device are released. Reprinted with permission from FEI Women’s Health.
Figure 5
The insertion tube is advanced for placement of the copper-releasing intrauterine device. Reprinted with permission from FEI Women’s Health.
Figure 6
The insertion rod of the copper-releasing intrauterine device is withdrawn. Reprinted with permission from FEI Women’s Health.
HORMONE-RELEASING IUD
As with the copper-releasing IUD, the proper equipment (Table 2) for insertion of the hormone-releasing IUD should be assembled before the procedure. Then, a bimanual examination with nonsterile gloves should be done to determine the position of the uterus. Sterile technique with sterile gloves is necessary during the procedure itself to minimize the risk of contamination or infection. The cervix and adjacent vaginal mucosa should be cleansed liberally with an antiseptic solution. Chlorhexidine gluconate may be used if the patient is allergic to iodine.
The physician should stabilize the cervix during the insertion of the IUD with a tenaculum. Local anesthesia, such as 5 percent lidocaine gel placed in the cervical canal, or a paracervical block may be used to minimize discomfort.
A sterile uterine sound or an endometrial aspirator should be used to determine the depth of the uterine cavity. Contact with the vagina or speculum blades should be avoided. An adequate uterine depth is between 6 and 9 cm and should be documented in the patient’s record. An IUD should not be inserted if the depth of the uterus is less than 6 cm.
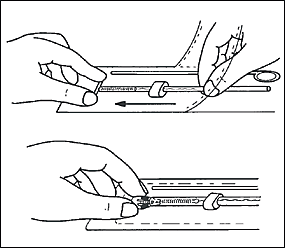
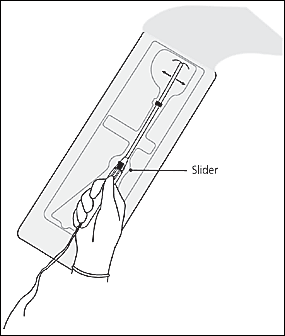
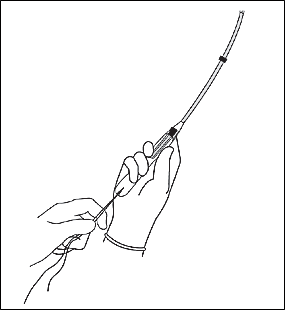
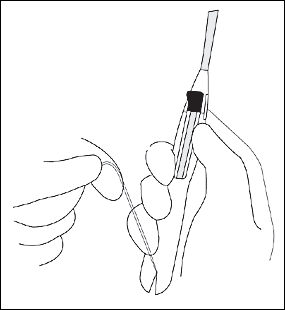
The physician should open the sterile IUD package, put on sterile gloves, pick up the inserter containing the IUD, and carefully release the threads from behind the slider, allowing them to hang freely. The slider should be positioned at the top of the handle nearest the IUD. While looking at the insertion tube, the physician should check that the arms of the device are horizontal. If not, they must be aligned using sterile technique (Figure 7). The physician should pull on both threads to draw the IUD into the insertion tube so that the knobs at the end of the arms cover the open end of the inserter (Figure 8). The threads should be fixed tightly in the cleft at the end of the handle (Figure 9), and the flange should be set to the depth measured by the sound (Figure 10).
Figure 7
The arms of the hormone-releasing intrauterine device are aligned to a horizontal position when removing the device from the package. Reprinted with permission from Berlex, Inc.
Figure 8
The hormone-releasing intrauterine device is drawn into the insertion tube. Reprinted with permission from Berlex, Inc.
Figure 9
Threads are fixed tightly in the cleft. Reprinted with permission from Berlex, Inc.
Figure 10
The flange is adjusted to sound depth. Reprinted with permission from Berlex, Inc.
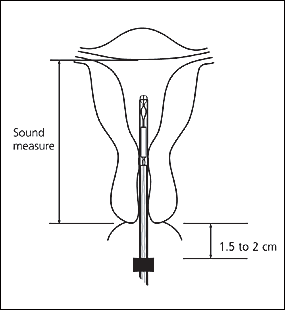
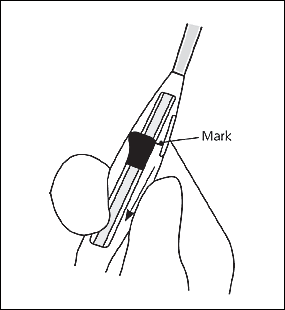
The physician should insert the IUD by holding the slider firmly at the top of the handle and gently placing the inserter into the cervical canal. The insertion tube should be advanced into the uterus until the flange is situated at a distance of about 1.5 to 2 cm from the external cervical os, allowing ample space for the IUD arms to open. While holding the inserter steady, the physician should release the arms of the IUD by pulling the slider back until the top of the slider reaches the raised horizontal line on the handle (Figure 11). The inserter should be pushed gently into the uterine cavity until the flange touches the cervix.
Figure 11
The slider is pulled back to reach the mark. Reprinted with permission from Berlex, Inc.
The IUD should now be positioned at the top of the fundus. The physician then releases the IUD by pulling the slider all the way down while holding the inserter firmly in position. The threads will be released automatically (Figure 12). The inserter should be removed from the uterus. Finally, the threads emerging from the cervical os should be cut to a length of 2 to 3 cm. The length of the threads in the vagina should be noted in the patient’s record for further reference.
Figure 12
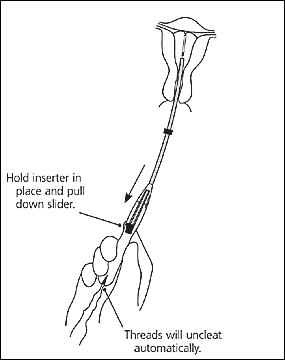
The inserter is withdrawn while the intrauterine device is released. Reprinted with permission from Berlex, Inc.
The manufacturers of both IUDs have created practice kits that can help physicians learn to insert an IUD.
Adverse Effects
Following insertion of either device, a follow-up appointment should be planned after the next menses to address any concerns or adverse effects, ensure the absence of infection, and check the presence of the strings.
The most common adverse effects of IUDs are cramping, abnormal uterine bleeding, and expulsion (Table 3).4,5,7,11,12 Adverse effects related specifically to the hormone-releasing IUD include amenorrhea, acne, depression, weight gain, decreased libido, and headache. First-year failure rates are reported to be between 1 and 2 percent.1
TABLE 3 Adverse Effects or Complications from IUDs
| Cramping |
| Displaced threads |
| Ectopic pregnancy |
| Embedment or fragmentation of IUD |
| Expulsion |
| Infertility |
| Pelvic infections |
| Septicemia during pregnancy |
| Tubo-ovarian damage |
| Uterine or cervical perforation |
| Vaginal bleeding, with or without anemia |
| Vasovagal reaction (on insertion) |
IUD = intrauterine device.
If the IUD threads are ever not present, a pregnancy test should be performed. When the results are negative, a cytobrush can be inserted gently into the cervical canal to locate the threads. If this method is unsuccessful, radiography or ultrasonography may be used to locate the IUD. Uterine perforation, which is more likely to occur during insertion of the device, ranges from 0.1 to 0.3 percent.11
When the results of the pregnancy test are positive, an ectopic implantation must be ruled out. If the strings are visible and the pregnancy is early, the IUD can be removed but with a risk of pregnancy loss. If the strings are not visible, ultrasonography should be performed to identify the IUD for removal.
Removal
An IUD should be removed at the expiration date, when the patient develops a contraindication, when adverse effects do not resolve, or on patient request. Treatment for cervical dysplasia may be different with the IUD present. Colposcopy may be performed, but the IUD should be removed if an excisional procedure is performed.
The IUD is removed by securely grasping the threads at the external os with ring forceps. Traction should be applied away from the cervix. If resistance is met, the removal should be abandoned until it is determined why the IUD is not moving. A deeply embedded IUD may have to be removed hysteroscopically.