Telemedicine can provide patients with cost-effective, quality care. The coronavirus disease 2019 pandemic has highlighted the need for alternative methods of delivering health care. Family physicians can benefit from using a standardized approach to evaluate and diagnose musculoskeletal issues via telemedicine visits. Previsit planning establishes appropriate use of telemedicine and ensures that the patient and physician have functional telehealth equipment. Specific instructions to patients regarding ideal setting, camera angles, body positioning, and attire enhance virtual visits. Physicians can obtain a thorough history and perform a structured musculoskeletal examination via telemedicine. The use of common household items allows physicians to replicate in-person clinical examination maneuvers. Home care instructions and online rehabilitation resources are available for initial management. Patients should be scheduled for an in-person visit when the diagnosis or management plan is in question. Patients with a possible deformity or neurovascular compromise should be referred for urgent evaluation. Follow-up can be done virtually if the patient's condition is improving as expected. If the condition is worsening or not improving, the patient should have an in-office assessment, with consideration for referral to formal physical therapy or specialty services when appropriate.
Telemedicine has rapidly become a valuable tool during the coronavirus disease 2019 (COVID-19) pandemic.1 Given that musculoskeletal issues are a common reason for primary care visits,2,3 a standardized examination to evaluate these issues via telemedicine is useful. Video-assisted orthopedic consultation for selected patients is cost-effective and does not result in serious adverse events.4,5
SORT: KEY RECOMMENDATIONS FOR PRACTICE
| Clinical recommendation | Evidence rating | Comments |
|---|---|---|
| Video-assisted orthopedic consultation for selected patients is cost-effective.4 | B | Economic evaluation based on randomized controlled trial comparing video-assisted remote consultation with standard care |
| Video-assisted orthopedic consultation for selected patients does not result in serious adverse events.5 | B | Randomized controlled trial comparing video-assisted remote consultation at a regional medical center with standard consultation at an orthopedic outpatient clinic |
| The management of musculoskeletal conditions via telerehabilitation is effective in improving physical function, disability, and pain.24 | B | Systematic review |
A = consistent, good-quality patient-oriented evidence; B = inconsistent or limited-quality patient-oriented evidence; C = consensus, disease-oriented evidence, usual practice, expert opinion, or case series. For information about the SORT evidence rating system, go to https://www.aafp.org/afpsort.
This article discusses telemedicine methods and techniques, including visit preparation, history collection, virtual physical examination, and initial treatment options.
Virtual Visit Preparation
Before the visit, initial preparation includes confirming that the patient has functional audiovisual resources and providing instructions on ideal setting, camera angles, body positioning, and attire.6 The physician should review any previous imaging studies beforehand. Multiple telehealth platforms are compliant with the U.S. Health Insurance Portability and Accountability Act (HIPAA).7 A guide for preparing a medical practice for virtual visits was published previously in FPM.8
Virtual Musculoskeletal Evaluation
Patients should be asked about the timing and characteristics of symptom onset, associated trauma, location of pain, presence of swelling, subsequent course, and current status. Functional impact on activities of daily living, employment, and recreational activities should be established. Physicians should ask about previous injuries and surgeries, as well as previous management and response.
The virtual physical examination should include inspection, palpation, range of motion, strength, neurovascular assessment, and special tests.9,10 Although certain maneuvers are difficult to perform virtually, modifications can provide useful information. It may be helpful for the patient to mirror the physician's motions.
SHOULDER
For shoulder problems, the physician should ask if the patient's primary concern is pain, weakness, or decreased range of motion. Pain in the absence of a recent traumatic event often indicates shoulder impingement or calcific tendinopathy.11 Pain with cross-arm adduction can indicate acromioclavicular pathology.9,11,12 Weakness suggests complete rotator cuff tear or nerve pathology. Decreased range of motion raises suspicion for adhesive capsulitis or severe osteoarthritis.9,13,14 Patients should also be asked about distal neurovascular symptoms of the upper extremity, such as weakness or paresthesia.
The virtual physical examination begins with inspection. The patient should wear a tank top or sports bra according to individual comfort. The patient should be asked to face the camera and then slowly rotate their body 360 degrees so that the physician can observe the shoulder joint in all planes. The physician should look for asymmetry, deformity, abnormal posture, overlying skin changes, atrophy, erythema, and ecchymosis.
The physician should ask the patient to point to the area of maximal tenderness. The patient should be directed to use the contralateral hand to palpate the sternoclavicular joint, clavicle, acromioclavicular joint, acromion, and spine of the scapula, as range of motion allows. Patients can also locate and palpate the bicipital groove and greater tuberosity of the humerus with direction from the physician (Figure 1).
FIGURE 1.
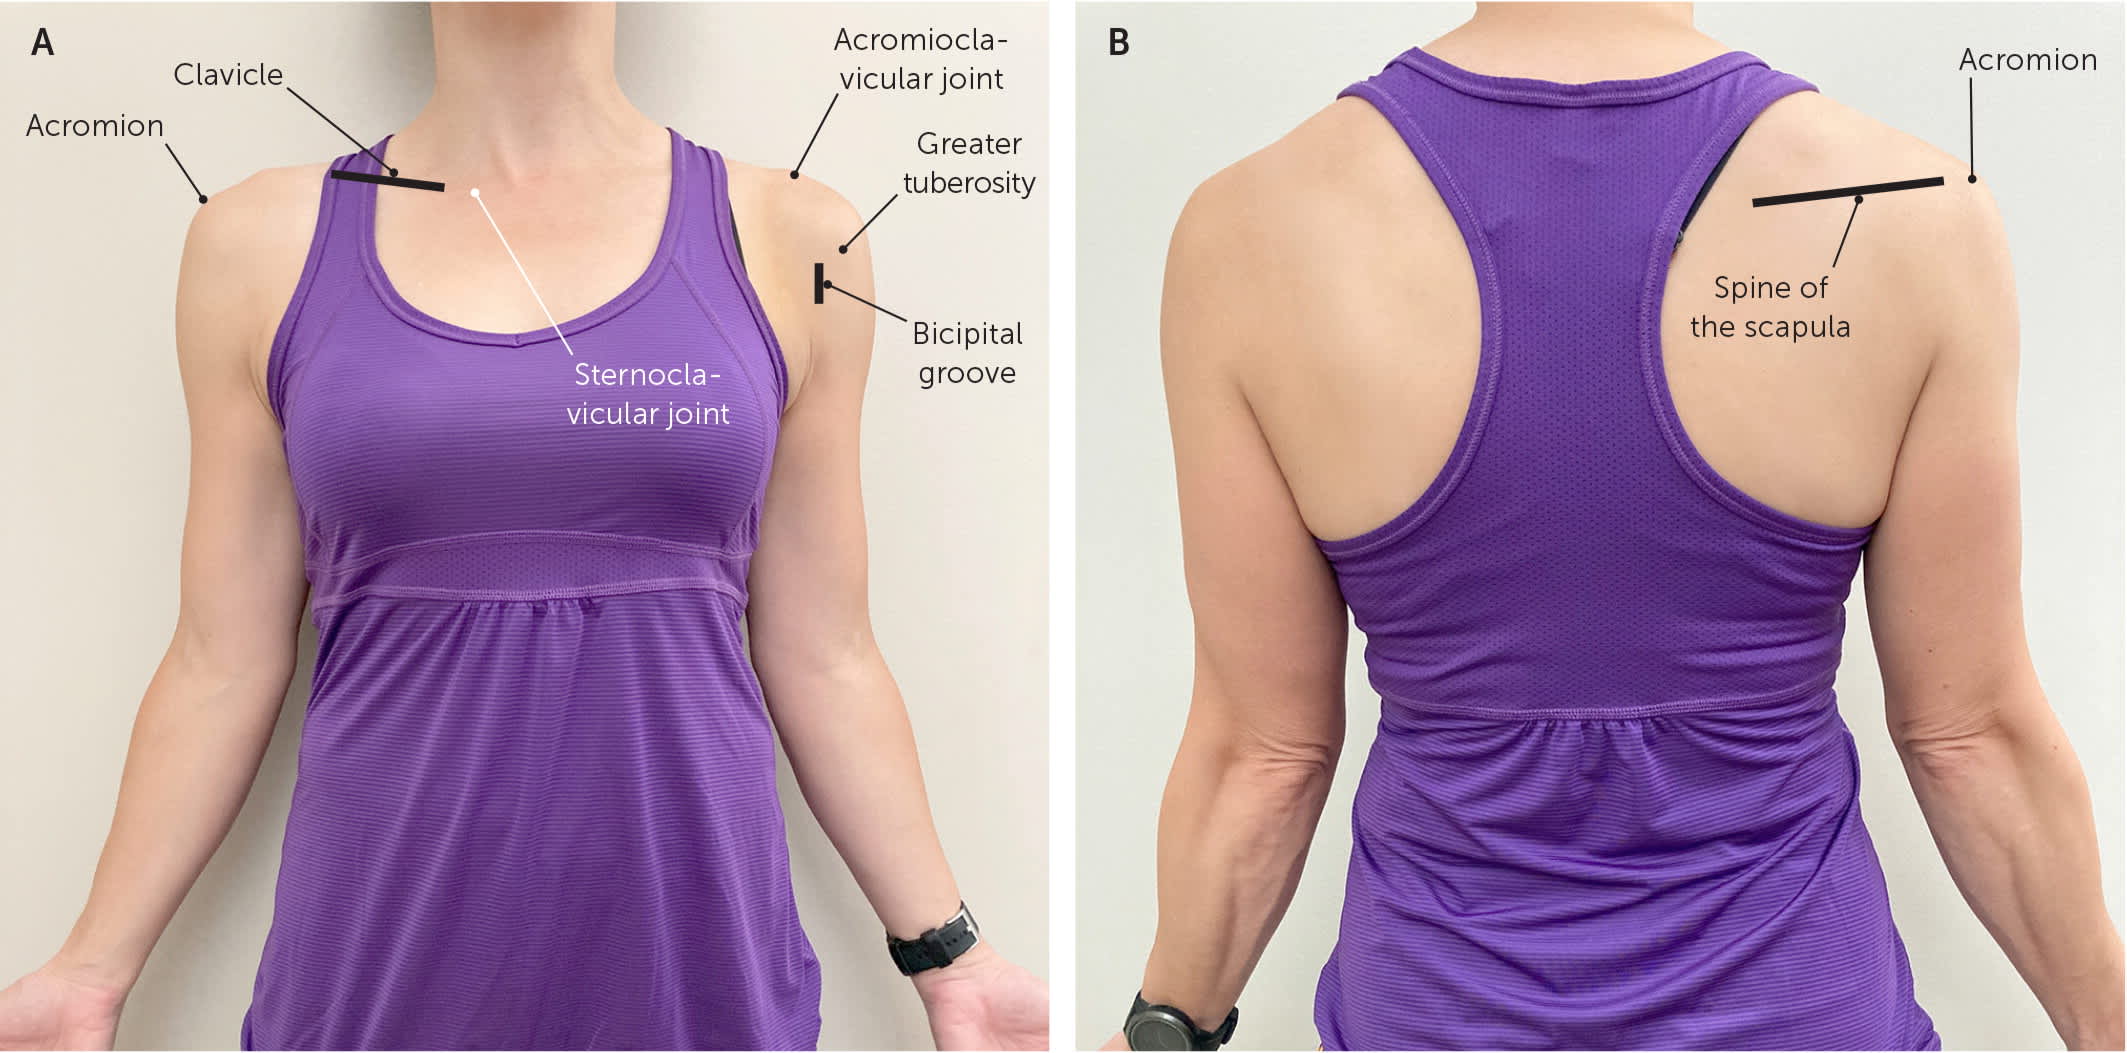
Shoulder palpation positioning. (A) Anterior view. (B) Posterior view.
Shoulder abduction, forward flexion, extension, external rotation, and internal rotation active range of motion (Table 111) should be assessed. Alterations of scapular motion during abduction and flexion indicate scapular dyskinesia or weakness of the scapular stabilizing muscles.
TABLE 1. Telemedicine Assessment of Upper Extremity Range of Motion
| Plane of range of motion | Patient body positioning* | Normal range of motion (degrees)11 |
|---|---|---|
| Shoulder | ||
| Abduction | Away from the camera | 180 |
| Extension | 90 degrees to the side | 45 to 60 |
| Flexion | 90 degrees to the side for measurement, away from the camera for scapular stability | 180 |
| Internal rotation | Away from the camera for Apley scratch test | Able to reach vertebral height of T4–T8 |
| 90 degrees to the side, elbow abducted to 90 degrees | 90 | |
| External rotation | 90 degrees to the side, elbow at the side | 90 |
| 90 degrees to the side, elbow abducted to 90 degrees | 90 | |
| Elbow | ||
| Flexion | Facing the camera, arm abducted to 90 degrees | 135 to 150 |
| Extension | Same as flexion | −10 to 0 |
| Supination | Facing the camera, elbow resting on table with arm to the side and elbow flexed to 90 degrees | 75 to 90 |
| Pronation | Same as supination | 75 to 90 |
| Wrist | ||
| Dorsiflexion | 90 degrees to the side | 70 |
| Palmar flexion | Same as dorsiflexion | 80 to 90 |
| Radial deviation | Facing the camera | 20 to 30 |
| Ulnar deviation | Facing the camera | 50 |
*—Relative to the camera.
Information from reference 11.
Strength testing can be performed by asking the patient to move their shoulder against gravity or by using common household items (Table 2). Table 3 summarizes suggested rotator cuff strength tests.9,11,15 Neurovascular assessment can be completed by having the patient perform a wall push-up so that the physician can look for scapular winging. Special tests of the shoulder, such as Speed test to check for proximal biceps tendinopathy and O'Brien test to detect labral pathology, can be performed using household items as resistance.
TABLE 2. Common Household Items That Can Be Used in Telemedicine Strength Testing
| Item | Approximate weight |
|---|---|
| Roll of nickels, cup of sugar, or three C cell batteries | 0.5 lb (0.23 kg) |
| Can of soup, block of butter, or 16-oz bottle of water | 1 lb (0.45 kg) |
| Quart of milk or 1-L bottle of soda | 2 lb (0.91 kg) |
| Bag of sugar or 2-L bottle of soda | 5 lb (2.27 kg) |
| Gallon of milk or large bag of potatoes | 9 lb (4.08 kg) |
TABLE 3. Telemedicine Assessment of Rotator Cuff Strength
| Supraspinatus |
| Patient lifts an object in the plane of scaption (90 degrees of abduction and approximately 30 degrees of forward flexion) |
| Patient fully abducts the arm and then slowly reverses the motion in the same arc. Test is positive for rotator cuff tear if arm drops suddenly or patient has severe pain (drop-arm sign) |
| Infraspinatus and teres minor |
| Patient lies on unaffected side and externally rotates against gravity or with an object |
| Subscapularis |
| With the patient facing to the side and the arm internally rotated behind the back, the patient lifts the hand away from the back against gravity (lift-off test) |
ELBOW
Virtual examination of the elbow begins with inspection of the affected side and comparison with the unaffected side, looking for erythema, deformity, swelling, ecchymosis, and overlying skin changes. The biceps and triceps should be checked for deformity to evaluate for tendon rupture. The patient should palpate over the lateral epicondyle, medial epicondyle, and olecranon to check for tenderness (Figure 2). Range of motion assessment is reviewed in Table 1.11 Strength of elbow flexion and extension can be assessed using gravity or common household items (Table 2). Pain that localizes to the lateral epicondyle with wrist extension and supination while holding a weighted object is suggestive of lateral epicondylitis. Similarly, pain that localizes to the medial epicondyle with wrist flexion and pronation while holding a weighted object is suggestive of medial epicondylitis.
FIGURE 2.
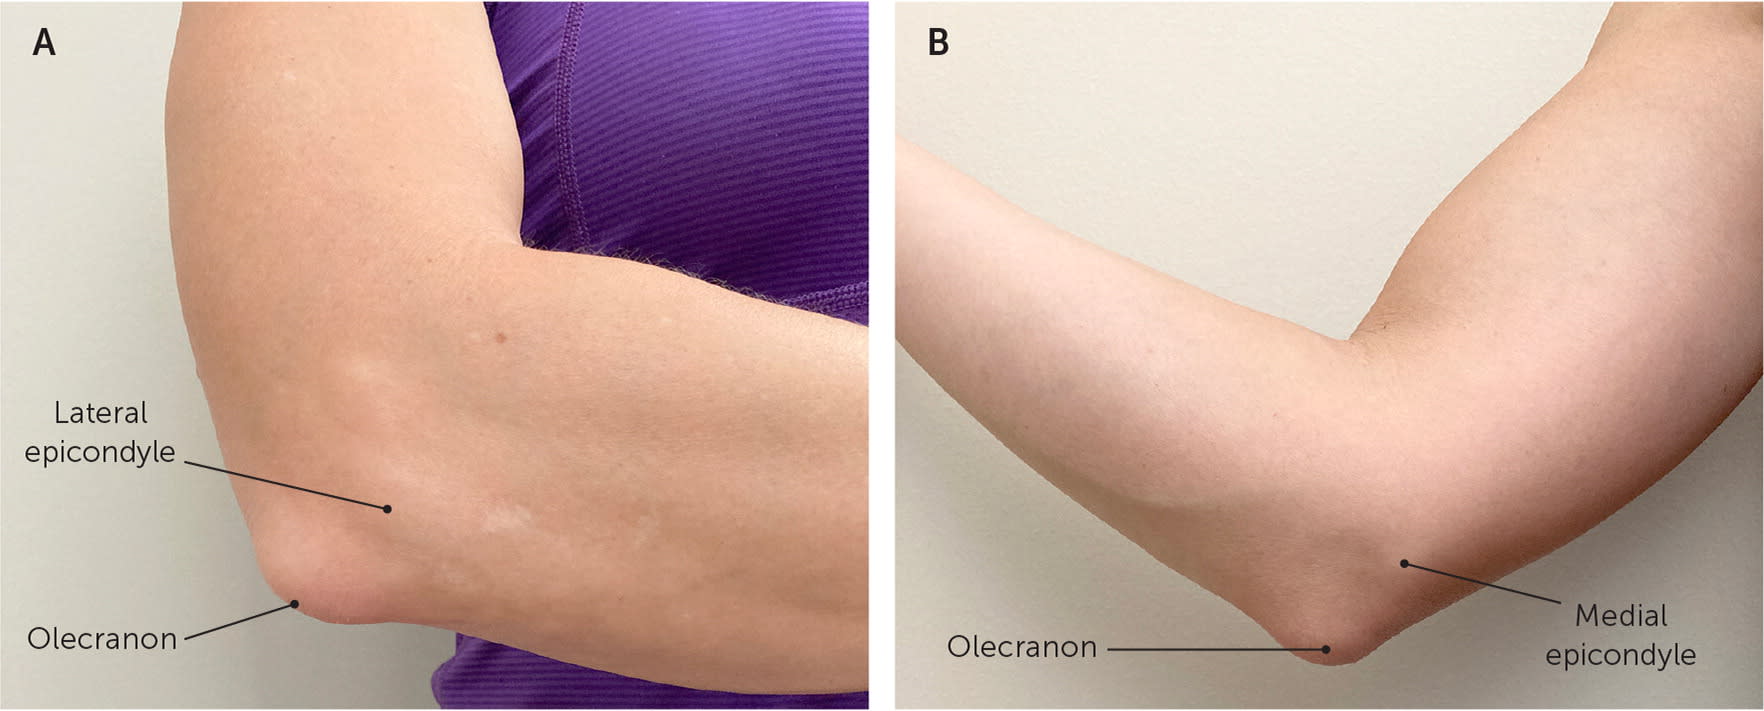
Elbow palpation positioning. (A) Lateral view. (B) Medial view.
HAND AND WRIST
The hand and wrist should be inspected for an obvious deformity, swelling, ecchymosis, overlying skin and nail changes, and atrophy compared with the contralateral side. The patient should be asked to point to the area of maximal tenderness and/or paresthesia. If the patient reports a recent traumatic injury, tenderness when palpating the anatomical snuff-box warrants further evaluation for scaphoid fracture16 (Figure 3).
FIGURE 3.
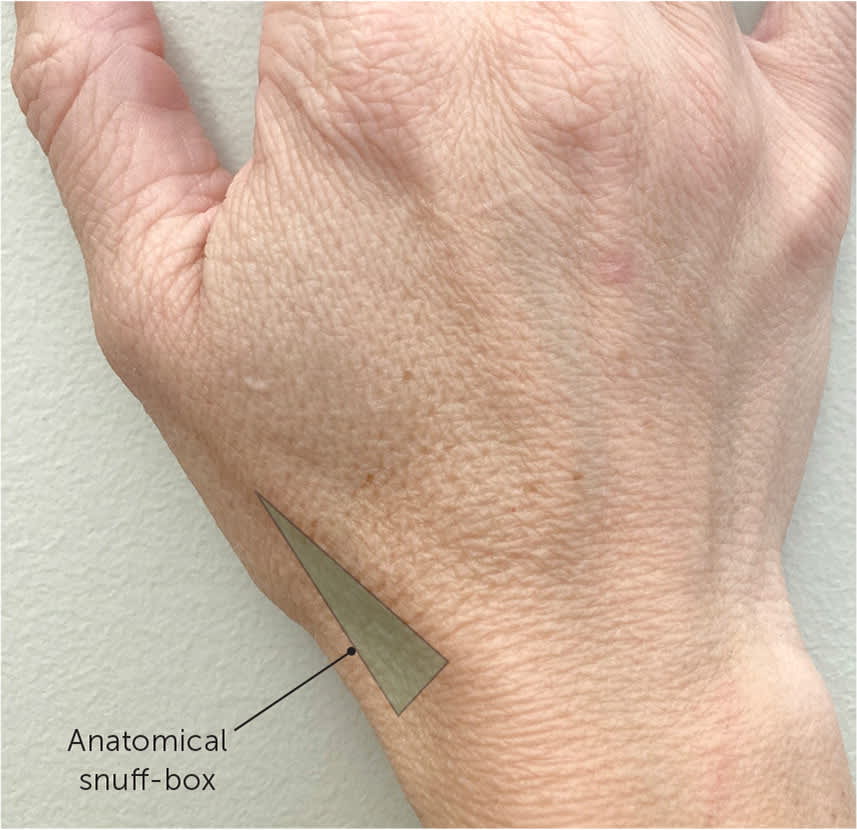
Anatomical snuff-box. Tenderness with palpation after a traumatic injury warrants further evaluation for scaphoid fracture.
Wrist range of motion should be assessed as outlined in Table 1.11 Hand range of motion is best assessed by asking the patient to make a fist, then extend the hand. If there is a concern about a flexor or extensor tendon rupture after traumatic injury, the patient should be asked to isolate movement at the proximal interphalangeal and distal interphalangeal joints. Special tests in the evaluation of the hand and wrist are summarized in eTable A.
eTABLE A Special Tests for Evaluating the Hand and Wrist
| Test | Technique | Condition |
|---|---|---|
| Finkelstein test | Patient grasps a weighted object and tilts wrist down (ulnar deviation) against gravity | Pain with this maneuver suggests de Quervain tenosynovitis |
| Froment sign | Patient grasps a piece of paper between thumb and index finger on affected side and attempts to pull it out with opposite hand | Difficulty holding paper suggests ulnar nerve injury |
| Phalen test | With arms raised to the level of shoulders, patient brings dorsum of hands together in midline, holding in forced flexion for 30 to 60 seconds | Burning, numbness, or tingling in the median nerve distribution suggests carpal tunnel syndrome |
| Press test | Seated patient pushes their body weight up off a chair using affected wristA1 | Focal ulnar wrist pain with this maneuver suggests triangular fibrocartilage complex injuries |
| Reverse Phalen test | With arms raised to the level of shoulders, patient brings palms together in midline, holding in forced flexion for 30 to 60 seconds | Carpal tunnel syndrome (same as Phalen test) |
Note: A video of shoulder assessments is available at https://www.youtube.com/watch?v=ZpynPil6mdg.
A1. Lester B, Halbrecht J, Levy IM, et al. “Press test” for office diagnosis of triangular fibrocartilage complex tears of the wrist. Ann Plast Surg. 1995;35(1):41–45.
HIP AND PELVIS
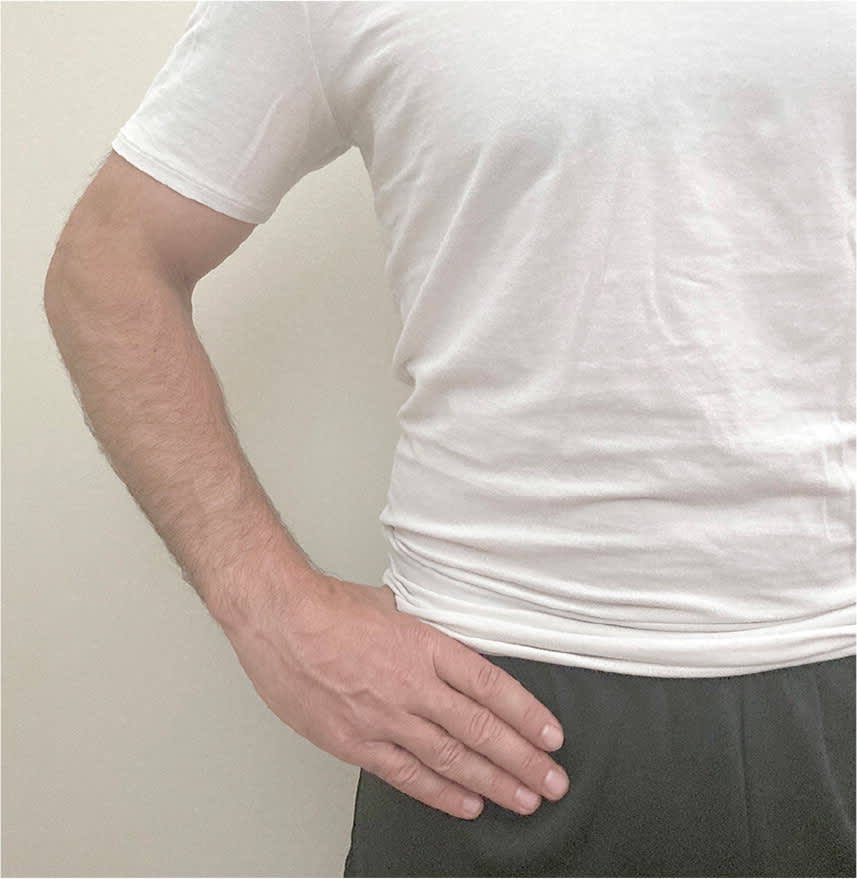
Virtual examination of the hip and pelvis begins with inspecting the patient standing, facing the camera, with feet shoulder width apart. The physician should ask the patient to place both hands, palms down, on the top of the iliac crests as the physician looks for symmetry in hand height and anterior/posterior alignment. Asymmetry of the iliac crest can indicate leg length discrepancy or pelvic rotation. Next, the patient should point to the most painful area. C sign around the hip (Figure 4) should raise suspicion for intraarticular pathology.17 The physician can then guide the patient to palpate the anterior superior iliac spine, anterior inferior iliac spine, and greater trochanter to check for tenderness (Figure 5).
FIGURE 4.
C sign. If the patient localizes pain by cupping the anterolateral hip with the thumb and forefinger in the shape of a “C,” intra-articular pathology should be suspected.
FIGURE 5.
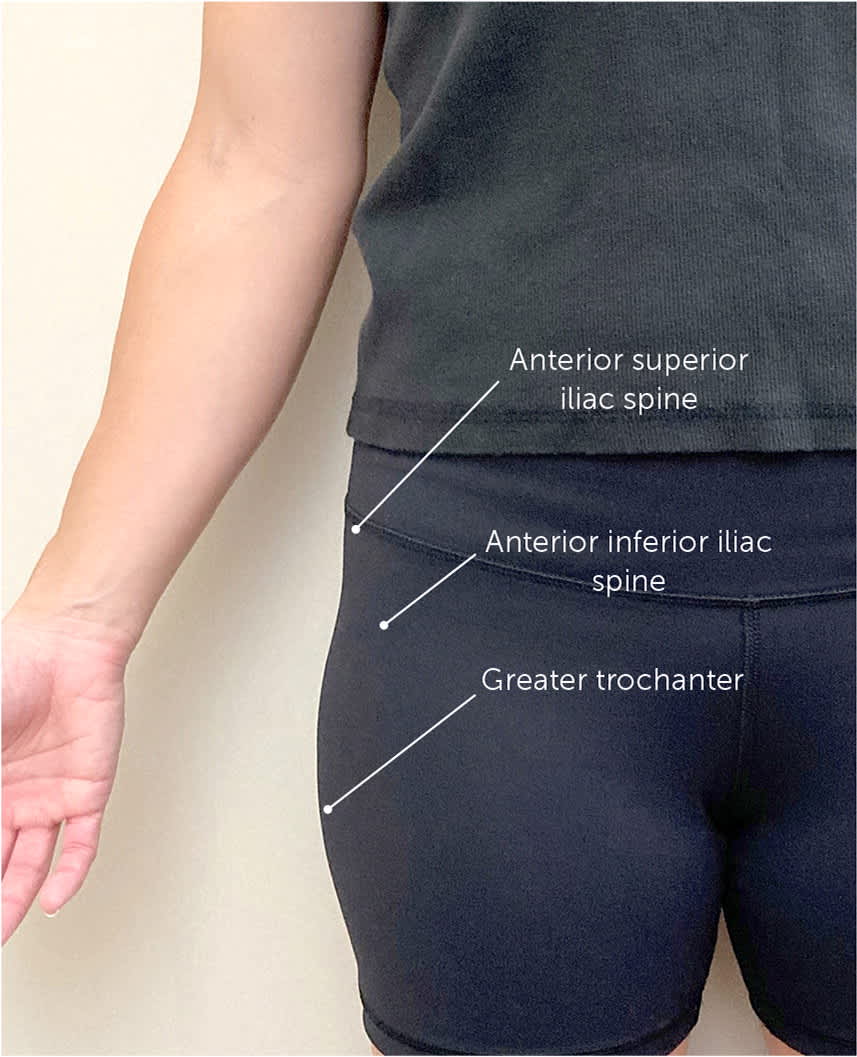
Hip palpation positioning.
Assessment of hip range of motion is summarized in Table 4.10,11 Strength can be assessed with heel walking (L4), toe walking (L5/S1), hip extension (L5/S1), hip abduction while the patient is lying on their side (gluteus medius, L5), and the patient standing unassisted.6 The patient can be asked to point along any areas of paresthesia. Special tests in the assessment of the hip are summarized in eTable B.
TABLE 4. Telemedicine Assessment of Lower Extremity Range of Motion
| Plane of range of motion | Patient body positioning* | Normal range of motion (degrees)10,11 |
|---|---|---|
| Hip | ||
| Flexion | 90 degrees to the side, standing or supine position; knee is pulled to the chest | 120 |
| Extension | 90 degrees to the side, standing or prone position, with extended straight leg | 10 to 20 |
| Internal rotation | Facing the camera, seated with knee bent to 90 degrees and leg rotated at the hip (not the knee) | 40 |
| External rotation | Same as internal rotation | 45 |
| Knee | ||
| Flexion | Affected side facing the camera, seated | 130 to 135 |
| Extension | Affected side facing the camera (allows for demonstration of hyperextension if present), standing | −10 to 0 |
| Ankle | ||
| Dorsiflexion | Affected side facing the camera, seated with knees bent and feet not touching the floor | 20 |
| Plantar flexion | Same as dorsiflexion | 45 |
| Inversion | Facing the camera, seated with knees bent and feet not touching the floor | 30 |
| Eversion | Same as inversion | 20 |
*—Relative to the camera.
eTABLE B Special Tests for Evaluating the Hip

| Test | Technique | Condition |
|---|---|---|
| FABER (Patrick) test | While the patient is lying on their back, the hip is flexed, abducted to the side, and externally rotated into a “figure of four” position | Sacroiliac joint or intra-articular pathology (depending on localization of pain) |
| FADIR test | While the patient is lying on their back, the hip is flexed, adducted toward midline, and internally rotated | Pain suggests intra-articular pathology |
| Trendelenburg test | Patient stands facing away from camera and balances on one foot for 30 seconds | Inability to maintain pelvis stability parallel to the ground suggests pelvic instability (stance leg) |
FABER = flexion, abduction, external rotation; FADIR = flexion, adduction, internal rotation.
Information from:
Friedrich Trendelenburg (1844–1924). Trendelenburg's position. JAMA. 1969;207(6):1143–1144.
Wilson JJ, Furukawa M. Evaluation of the patient with hip pain. Am Fam Physician. 2014;89(1):27–34. Accessed August 25, 2020. https://www.aafp.org/afp/2014/0101/p27.html
KNEE
The knee examination should begin with observation of gait. Next, the knee is inspected for swelling, deformity, erythema, ecchymosis, and obvious muscle atrophy compared with the contralateral side. The patient should be asked to point with one finger to the location of maximal pain. The patient can next be guided to palpate the quadriceps and patellar tendons, patella, iliotibial band insertion, tibial tubercle, pes anserinus, and joint lines (Figure 6). If the patient reports recent trauma, the Ottawa Knee Rule (https://www.mdcalc.com/ottawa-knee-rule) can be used to determine whether imaging is necessary to evaluate for a fracture.10,11,18,19
FIGURE 6.

Knee palpation positioning. (A) Medial view. (B) Lateral view.
Assessment of knee range of motion is detailed in Table 4.10,11 Strength should be assessed with the patient seated and the knee in active flexion and extension. Inability to actively extend the knee should raise suspicion for patellar or quadriceps tendon injury and requires imaging.6 Special tests in the assessment of the knee are summarized in eTable C
eTABLE C Special Tests for Evaluating the Knee
| Test | Technique | Condition |
|---|---|---|
| J sign | While seated and facing the camera, patient actively flexes and extends the knee as physician observes patellar motion | Patellar tracking |
| Single leg squat | While standing and facing the camera, patient squats on one leg for three or four repetitions as physician observes knee alignment and balance | Pelvic instability (stance leg) |
| Thessaly test | While facing the camera, patient stands on one leg; the supporting leg is flexed 20 to 30 degrees and trunk is rotated back and forth | Pain with a mechanical click or catching sensation suggests meniscal pathology |
Note: Patients may use a sturdy chair or wall for support during the single leg squat and Thessaly test.
Information from:
Bunt CW, Jonas CE, Chang JG. Knee pain in adults and adolescents: the initial evaluation. Am Fam Physician. 2018;98(9):576–585. Accessed August 25, 2020. https://www.aafp.org/afp/2018/1101/p576.html
Karachalios T, Hantes M, Zibis AH, et al. Diagnostic accuracy of a new clinical test (the Thessaly test) for early detection of meniscal tears. J Bone Joint Surg Am. 2005;87(5):955–962.
ANKLE AND FOOT
Virtual examination of the ankle and foot should be performed with the patient barefoot and wearing shorts and the patient's camera positioned low enough for adequate visualization. The physician should inspect the ankle and foot for edema, gross deformity, ecchymosis, erythema, and muscle atrophy in comparison with the contralateral side. The patient should be directed to stand, facing away from the camera, with feet shoulder width apart. The physician counts the number of toes that are visible lateral to each ankle. If more than 2 1/2 toes are seen, hyperpronation or out-toeing should be considered. The physician should assess for pes cavus or pes planus and observe hindfoot and knee alignment, standing and walking, to check for valgus or varus deformity.
Next, the patient should sit facing the camera and point to the area of maximal pain. In patients with a traumatic injury such as an ankle inversion, the Ottawa Ankle Rule (https://www.mdcalc.com/ottawa-ankle-rule) can be used to determine whether imaging is needed to evaluate for a foot or ankle fracture.11,20–22 The proximal fibula should also be palpated after a traumatic ankle injury to evaluate for an associated Maisonneuve fracture.
Assessment of ankle range of motion is detailed in Table 4.10,11 Strength can be evaluated against gravity or against resistance with a towel or exercise band. With good lighting and appropriate camera positioning, capillary refill distal to the injury can be assessed. The physician can guide the patient to check for gross sensation to light touch along dermatomal distributions. In a traumatic injury, the squeeze test may be performed by having the patient apply circumferential pressure to the largest part of the calf; pain along the distal tibiofibular interosseous membrane suggests a high ankle sprain.22
Previous articles in American Family Physician discuss the evaluation of the shoulder,9,12 elbow,23 hand/wrist,16 hip,17 knee,10 and foot/ankle22 in more detail.
Management
Findings from the virtual history and physical examination often suggest a likely diagnosis. However, physicians should have a low threshold for proceeding with further evaluation if the diagnosis or initial management is unclear. If there is concern for deformity or neurovascular compromise, the patient should be referred for further evaluation in the office or emergency department. Further evaluation may include an in-person examination and/or imaging studies.
An initial telemedicine visit may avoid unnecessary imaging studies. If the patient will be seen in person, obtaining appropriate imaging in advance can streamline the evaluation. If imaging is available at the time of a virtual encounter, screen-sharing capabilities can allow the physician to review results with the patient.
Home care instructions and online rehabilitation resources are available for initial management and are especially helpful when clinical resources are limited, the patient has transportation challenges, or exposure to the clinical setting could be detrimental to the patient.24 The management of musculoskeletal conditions via telerehabilitation is effective in improving physical function, disability, and pain.24
Follow-up may be performed virtually if the patient's condition is improving as expected. If the condition is worsening or not improving, the patient should have an in-office assessment, with consideration for referral to formal physical therapy or specialty services when appropriate.
Data Sources: PubMed and the Cochrane database were searched using the key terms telemedicine, telehealth, virtual, orthopedic, musculoskeletal, and rehabilitation. Essential Evidence Plus was also searched. Search dates: May to November 2020.
The contents of this article are solely the views of the authors and do not necessarily represent the official views of the Uniformed Services University of the Health Sciences, the U.S. military at large, the U.S. Department of Defense, or the U.S. government.